This website is quite out of date.
I've done lots of fun stuff since mid-2012, but haven't updated this website. If you'd like to see more recent examples of what I've been up to, have a look at my GitHub profile and Gists.

Robo-gun and the soldiers

By Stephen Holdaway

1 Nov, 2011

In this project you will design a non-biological based character that will navigate and react to an environment. You should focus primarily on the behavior of this “character”, but also find a distinctive and economical visual representation. You should find a visual representation that is a compelling but minimal showcase for the behavior you create.

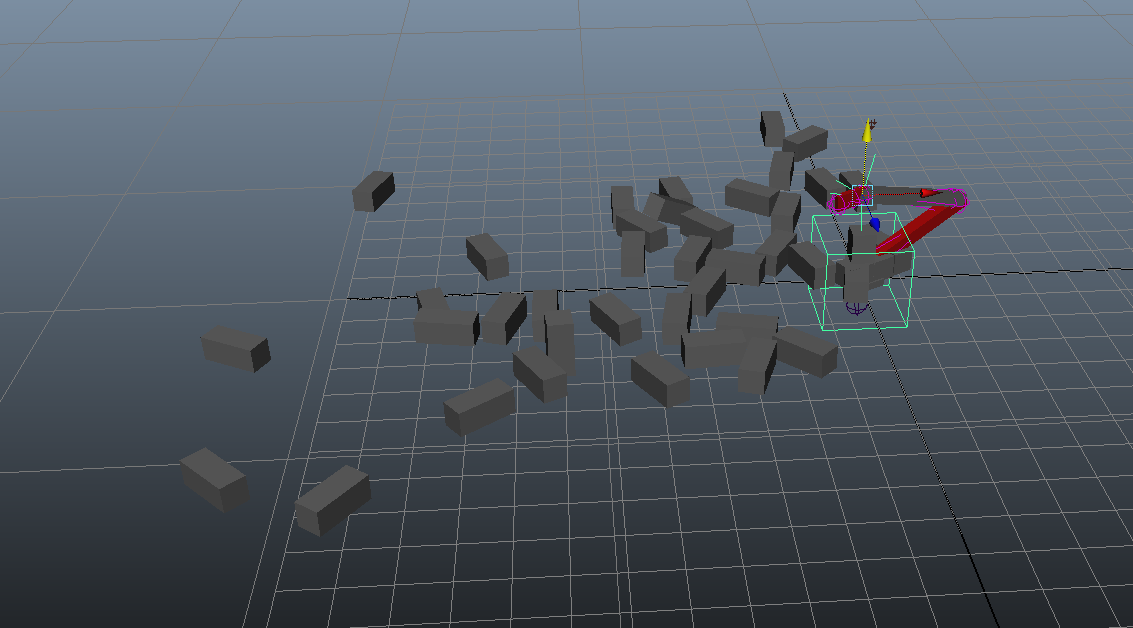
Robo-gun is intent on destroying the incoming plastic soldiers (which oddly resemble slime covered zombies) and does so with deadly precision. A python script generated and key-framed all behavior in this scene. Under the hood are some driven keys, expressions, and rigid-body simulations to simplify the aiming and animations. There’s a bit of jumpiness when the invaders are shot, since I didn’t work out how to cache rigid-body simulations/set the initial simulation frame for each soldier.

The source can be downloaded here under a Creative Commons Zero licence, and there’s a detailed write-up on this project with more images here (PDF, 1.25MB).

Development

I really enjoyed this project and had a good bit of fun. While it wasn’t required, I do wish I had spent more time on the aesthetic and render quality. The models weren’t great (though they were functional), and the render quality really suffered because of time constraints (I had to significantly lower the render settings).

What was left out

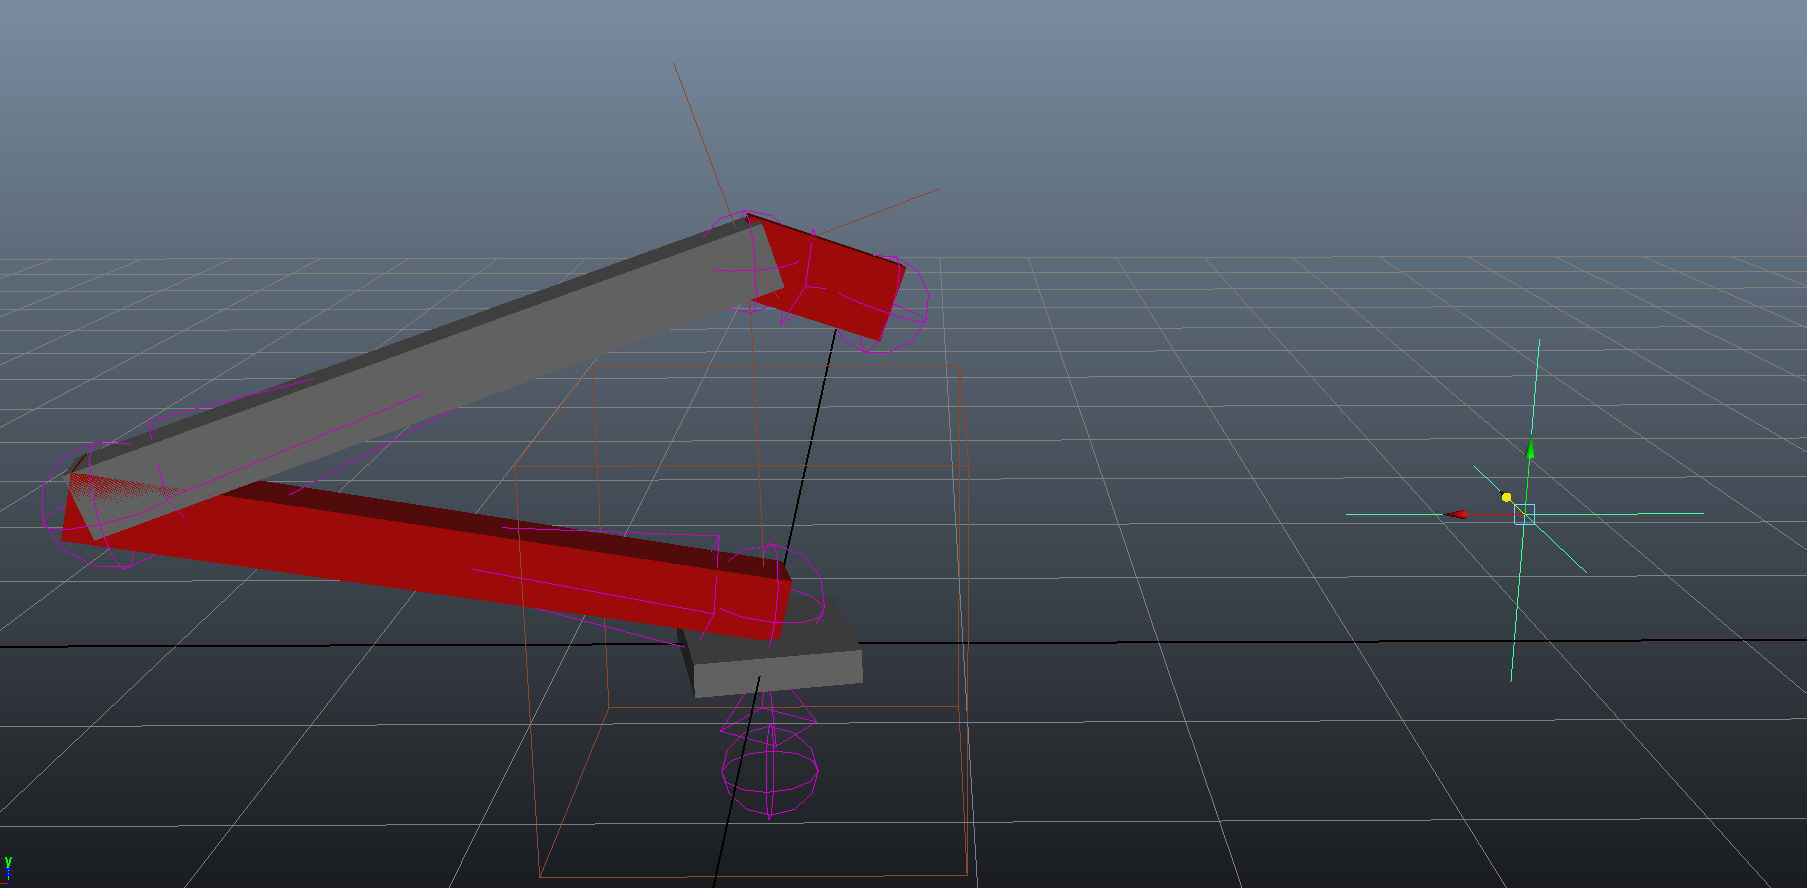
I began working on two things that ended up getting left out because of time and bugs: particle muzzle flash and cartridge ejection from the gun. I almost had cartridge ejection nailed, but it unexpectedly caused a massive bug that I couldn’t trace and blocked the generation script from running at all unless I deleted duplicates of the cartridge reference (maybe a duplicate name issue). The cartridge ejection used rigid bodies like the soldier deaths, and it looked pretty darn awesome during generation the one and only time I managed to get it to run. You can see the cartridge reference model hiding inside the gun x-ray view below.

I started experimenting with particles for muzzle flash, but ran out of time as it caused Maya to crash frequently. I didn’t get any screenshots of this, but it was pretty basic – just a directional particle emitter in the end of the barrel which would have its generation rate hooked into the custom attribute that controlled the slide and hammer action.

Images

Concept sketch

This is a backdated post. The publish date reflects when the it would have been posted originally, however the actual publish date was later. This post was last modified 15 Oct, 2012.


They are watching.

By Stephen Holdaway

10 Oct, 2011

Instructions:

  1. You need a webcam or other video device plugged in. If you don’t, you’ll just see black.
  2. Toggle the application on. It’s reasonably CPU intensive even when idle, hence it’s off by default.
  3. Allow flash to use your camera
  4. Select the right camera (if required) under the flash settings menu
  5. Use the controls below to play with it. You’ll probably want to press D to change display modes, since the default mode isn’t much fun. Also, move out of frame, then click to get comparison frame without you in it; the effect is better this way.

Controls:

Left click - take a new comparison frame (used for computing difference)
D - Cycle display modes
C - Cycle resolution (640x360, 960x544, 1280x720)
F - Toggle fullscreen (non-embeded version)
G - Toggle grain
H - Toggle reflect horizontally

Behind the scenes

Following closely on the heels of the text-to-speech rap I created in the previous project for this course, this interactive display was my own take on our group’s ‘life as a role-playing computer game’ manifesto. A large part of our manifesto suggested measuring everything that every person does in order to have game-like stats and leveling up in real life. Naturally this would require an obscene amount of surveillance; They are watching was a response to this.

I ended up with a few days around classes to develop an application from my design concept. I knew roughly how the code would work, since I had already completed two projects using a similar method – image difference combined with blob tracking. The primary issue was that I needed a cross-platform solution for capturing video from a webcam. I first tried Processing since I had used in my first year at uni, however that required QuickTime and a few other nasty hacks just to get a video stream. Next I tried Java, but again I couldn’t find a solution with no dependencies and/or a guarantee to work. Finally, after a a night of trying odds and ends in a variety of different languages, I settled on Flash and ActionScript 3; it just worked with webcams, and as a bonus I found an existing blob tracking algorithm written in AS3.

The next slight hurdle was that I had never worked with Flash or ActionScript before. Ever. Not to worry! I figured out the syntax on the go and had a working application by the end of the night. Not the most efficient application, but it worked.

Notes

Since this was made for controlled deployment with my own webcam, three resolutions are hard-coded (at 30fps): 640×360, 960×544 and 1280×720. I have no idea what will happen if a device doesn’t support one of these resolutions, but I imagine the application won’t work.

If you have trouble with the embedded version above, you can download a windows binary of this application (5MB).

You can download the source files under the Creative Commons Zero licence.

Images

Rotating panes of fake information tracking on each passer by. This was quickly restricted by time constraints and the rudimentary blob detection algorithm I used.

Presentation display mode.

Running on a TV in the design school atrium

This is a backdated post. The publish date reflects when the it would have been posted originally, however the actual publish date was later. This post was last modified 11 Oct, 2012.


Internet

By Stephen Holdaway

2 Oct, 2011

MDDN311 Project 2: Genesis

For this project you will create a form using generative techniques in Maya with Python scripts.

Results

Development images

My initial idea was to have one cable coming out of a sphere of cables with jacks pointing out, evenly distributed across the surface:

At some point, I changed direction and decided to render wireless/radio waves with the network cables I was already generating:

Finally, I removed one end of the cable and used my existing code to generate smaller cables coming from the end of each main cable:

The python script

The following Python script was written for Autodesk Maya 2011 to generate scenes like the ones at the top of this page. It requires the file JACK_FINAL.ma which contains the RJ45 plug model and materials that the script instances.

# "Internet" v5 by Stephen Holdaway
# Source models required: (RJ45 Jack w/ locator - JACK_FINAL.ma)

import maya.cmds as cmds
import math
import random

cableObject = "JACK_FINAL:cable_"
sourceObject = "JACK_FINAL:RJ45_Locator"
recursed = False
id = 0

def vAdd(l1,l2):
    o = []    
    for i in range(3):
        o.append(l1[i] + l2[i])
    return o

def vSub(l1,l2):
    o = []
    for i in range(3):
        o.append(l1[i] - l2[i])
    return o

def vDiv(l1,v = 0.0):
    o = []
    for i in range(3): 
        o.append(l1[i] / float(v))
    return o
    
def vMult(l1,v):
    o = []    
    for i in range(3):
        o.append(l1[i] * v)
    return o

def vGen(mult=1, XZ = False):
    o = []
    for i in range(3):
        o.append((random.random()-0.5)*mult)
    if(XZ):
        o[1] = 0;
    return o


def drawCable(start, end, objects, radius, child):
    # Draw Cable: create a curve with noise between two points and extrude a mesh using it
    # 
    # start          -    start co-ords as [x,y,z]
    # end            -    co-ords as [x,y,z]
    # objects        -    list of object names as [start_object,end_object,cable_object]
    # radius         -    radius of area of work in
    # child          -    boolean: is this cable a child of another
    
    cv = cmds.curve( p=(start), d=3)
    if(child):
        points = random.randint(4,radius)
        amp = (random.random()*2)
    else:
        points = random.randint(4,radius*2)
        amp = (random.random()*3)+1
    vec = vDiv(vSub(start,end),points)
    prevCV = start
    
    for i in range(points-1):
        p = vSub(start,vMult(vec,i+1))
        p[1] += amp*math.sin(math.radians(i*(90*random.random())));
        
        if(i==1):
            rx = math.atan2(p[2] - start[2], p[1] - start[1]) * (180/math.pi)
            cmds.setAttr(objects[0]+".rotateX", rx);
        
        prevCV = p;
        cmds.curve(cv, a=True, p=(p))
    
    cmds.curve(cv, a=True, p=(end))
    
    cmds.polyExtrudeEdge(objects[2]+".e[0:11]",kft=True, d=(points*10), inc=cv, sma=180, lrz=3600, ch=False)
    cmds.select(cv,r=True)
    cmds.delete()    
    
    global recursed
    if(recursed == False):
        recursed = True;
        colours = ["JACK_FINAL:mia_material4SG1","JACK_FINAL:mia_material3SG1","JACK_FINAL:mia_material6SG1","JACK_FINAL:mia_material3SG1","JACK_FINAL:mia_material7SG1","JACK_FINAL:mia_material3SG1"]
        for i in range(8):
            rt = generateCables(1, radius, s = end)
            cmds.select(rt)
            cmds.sets(rt,fe=colours[random.randint(0,5)])
    
    return objects[2]
    

def generateCables(count, radius, s = 0, shift = 0):
    # Generate two points within a radius
    # 
    # count          -    number of sets (wires) to generate
    # radius         -    radius of area of work in
    # s              -    start co-ords as [x,y,z]: when provided only one point is generated (relative to the given point)
    
    for i in range(count):
        points = [[],[]]
        objects = ['','','']
        child = False
        
        for ii in range(2):
            if(ii == 0 and s == 0):
                cmds.select(sourceObject)                
                objects[ii] = cmds.instance()[0]
                z = -radius + random.randint(round(-radius/4),round(radius/4))
            else:
                objects[ii] = cmds.spaceLocator()[0]
                if(s == 0):
                    z = -random.randint(round(-radius/4),round(radius/4))
                else:
                    z = (random.random() * radius)+1
                r = 0            
            
            o = objects[ii]
            if(ii == 0):
                global id
                cmds.select(cableObject)
                cableStub = cmds.duplicate(n="Cable_"+str(id)+"_"+str(shift))[0]; id+=1;
                objects[2] = cableStub
                if(s != 0 ):
                    cmds.scale(0.3,0.3,0.3,r=True)
                cmds.parent(cableStub,o)
                r = 180
            
            x = shift/2.0
            y = random.randint(round(-radius/2),round(radius/2))
            
            if(ii==0 and s != 0):
                 x = s[0]
                 y = s[1]
                 z = s[2]
             
            if(ii==1 and s != 0):
                 x = s[0] + (random.random()-0.5)*2
                 z = s[2] + z
                 child = True
            
            points[ii] = [x,y,z]
            
            cmds.setAttr(o+".translateX", x)
            cmds.setAttr(o+".translateY", y)
            cmds.setAttr(o+".translateZ", z)
            cmds.setAttr(o+".rotateY", r)       
        
        return drawCable(points[0], points[1], objects, radius, child)

for i in range(3):
    recursed = False
    generateCables(1,8,0,i);

This is a backdated post. The publish date reflects when the it would have been posted originally, however the actual publish date was later. This post was last modified 10 Oct, 2012.


Android Experiments

By Stephen Holdaway

5 Sep, 2011

Project number two for MDDN352 “Ubiquitous Computing” at Victoria University in 2011 was all about experimenting with mobile apps. The project, titled “Interaction Experiments” asked for three or more experiments that explored the various input options available on mobile devices (mic, touch-screen, accelerometer, gyroscope, 3D orientation/compass/magnetic field, light sensor, GPS, etc)

Keyboards and mice are being joined by a new wave of HCI input options. Touch screens and accelerometers introduce a rich field of interactive options to be explored. How do we begin to use these new, largely “invisible”, interfaces?

For this project, you will explore the multiple new inputs available to a new generation of smart phones and tablet computers by building interactive Flash Builder experiments. Conduct research into the existing interaction paradigms, and determine which tools are available to you. Try to imagine alternative methods of navigating content, generating user feedback loops, and eliciting delight in small interactions.

I opted to skip Flash Builder and used Java with the Android SDK to make my apps. I was putting myself in the deep end again as I had no experience with the Android SDK or Java, but where’s the fun if there’s no challenge, right?

Wander:

Uses orientation and location sensors. The application generates a random position at a user specified distance from the device’s known location, then a ‘needle’ and distance meter help the user find the location. The general idea is to encourage exploration and go to places the user wouldn’t otherwise. I intend to finish this application (add score, completion detection, a “close as I can get” button), polish it and put it on the Android Marketplace at some point.

Handgun:

Uses gyroscope sensor to turn your regular phone into a gun-phone! Complete with ammo count, reloading, and a range of gun sounds.

Sword:

Uses gyroscope sensor to turn your phone into a brutal weapon.

This is a backdated post. The publish date reflects when the it would have been posted originally, however the actual publish date was later. This post was last modified 8 Oct, 2012.


Headsplosion

By Stephen Holdaway

26 Aug, 2011

Project 1 for a video special effects course (MDDN311) at Victoria University in 2011. I had initially wanted to do this non-violence spiel with an extremely violent/gory explosion, however I changed my idea to something less predictable (and more friendly to work on) shortly after starting.

I’m not too happy with the neck (needs more detail and some movement), but it was a fun experiment. I used Adobe After Effects to add the feathers.

This is a backdated post. The publish date reflects when the it would have been posted originally, however the actual publish date was later. This post was last modified 15 Oct, 2012.


This is Dave

By Stephen Holdaway

16 Aug, 2011

An 8-bit style video and rap to present a manifesto for a society based on principles and attributes found in video games. This was a group project for CCDN331 at Victoria University.

Dave

Credits

  • Voice is text to speech generated with AT&T’s text to speech engine demo
  • Base song is “Goof” by Binärpilot.
  • Rap lyrics by Stephen Holdaway and Robert McLeod.
  • Audio editing (building text-to-speech over song) – Stephen Holdaway.
  • Graphics by Alex Klarichch, Jushang Chen, Robert McLeod, and Zac Rutten.

This is a backdated post. The publish date reflects when the it would have been posted originally, however the actual publish date was later. This post was last modified 31 Aug, 2012.


Man Up Logo

By Stephen Holdaway

28 Jul, 2011

Man Up is a fictional coffee company/brand I created in the course MDDN352 at Victoria University in 2011 to compliment the course’s other projects. The company makes coffee for real men only, and is intended to be completely over the top. This brand is aimed at men who are so manly, they drink scalding hot motor oil for breakfast.

Logo development

This is a backdated post. The publish date reflects when the it would have been posted originally, however the actual publish date was later. This post was last modified 1 Oct, 2012.


Backyard Resistance

By Stephen Holdaway

24 Jun, 2011

Backyard Resistance is a first person shooter style game made in Blender utilising the Blender Game Engine, for the Victoria University of Wellington course MDDN343: Advanced Computer Game Design (2011). I was responsible for the game’s environment.

In Backyard Resistance, your private backyard barbecue turns sour when your entire neighborhood shows up uninvited; attracted by the smell of tasty sizzling sausages. Luckily (for no apparent reason) you have an unlimited supply of jandals that make fantastic projectiles! Standing at your BBQ, you must fend off waves of hunger-crazed neighbors by hurling jandals. If those invaders eat all of your sausages, your backyard barbecue will be a (flip-)flop! To help you out in this epic battle, your friendly friend Carol tries to bring you picnic baskets full of sausage replenishments and enhanced jandal weapons, so long as you don’t hit her by mistake!

Gameplay Video

Here’s an unedited recording showing all elements of the game.

Trailer

This trailer was made by one of the others in the group. The low render quality was something to do with his computer needing MOAR POWER.

Credits

Andrew Millar Concept and assets (design)
Ben Dudson Characters and animation (design)
Stephen Holdaway Environment and props (design)
Vecheslav Novikov Scoring and HUD (programming)
Damian Kaye Character logic (programming)
Sean Arnold Player interaction, cameras and weapons (programming)

Screenshots

3D environment - in-game screenshot, Backyard Resistance

This is a backdated post. The publish date reflects when the it would have been posted originally, however the actual publish date was later. This post was last modified 15 Oct, 2012.


Post-Nuclear Tardigrade

By Stephen Holdaway

6 Apr, 2011

Setting

In 2014, after pressure from members of the United Nations, the US government activates anti-terrorist operation, ‘Black Shadow’ that mobilises thousands of troops to occupy North Korea in an attempt to cease its ever persistent nuclear weapons program. 74 hours after the activation of operation Black Shadow, the North Korean government becomes aware of incoming US military warships, and threatens nuclear retaliation. The US government has no choice but to pull the plug on operation Black Shadow however, disturbed atmospheric conditions prevent the Black Shadow warship convoy from ever receiving the transmission.

With no sign of retreat from US military warships 4 hours after their warning, the North Korean government launches and detonates a single 5 megaton nuclear warhead over the US convoy in the East China Sea; killing, injuring and poisoning thousands of US military and navy personal. 300 kilometres off China’s eastern shore, the blast also kills thousands of innocent Chinese citizens, and causes massive tidal influxes around the East China Sea. Perceiving the nuclear detonation as a direct attack on their country, China launches a full scale invasion on North Korea.

To protect darker secrets than nuclear arms, North Korea fires a volley of nuclear missiles at China’s military strongholds, sparking an alliance-driven nuclear exchange: mutually assured destruction. Within 7 hours, the worlds population is reduced to 0.012%, and a nuclear winter quickly shrouds the earth in total darkness. The effects of concentrated, ionising radiation spread around the globe, rapidly extinguishing remaining life on the planet.

…Winds sing around the silent, corroding frames of skyscrapers and stadiums, and a thick layer of dust settles on the streets as nuclear winter passes and the sun dawns for the first time on a dead world. As light breaches into the ruins of North Korea however, something begins to stir…

Concept

The earth is obliterated in a nuclear war and the only surviving creatures are tardigrades. Herbivorous tardigrades seek to absorb nutrients from any material, while carnivorous tardigrades hunt the herbivores to feed upon their gathered nutrients. With little influence from a dead planet, an evolutionary arms race between herbivorous and carnivorous tardigrades takes off. (In addition having an extraordinarily high radiation tolerance, tardigrades can survive the icy vacuum of space, and intense heat, cold and pressure. In a word they are polyextremophiles, meaning they can withstand many environmental extremes – pretty hardy little bastards.)

Turntable

Model created in Maya. Texture painted in Photoshop.

Development

This is a backdated post. The publish date reflects when the it would have been posted originally, however the actual publish date was later. This post was last modified 2 Oct, 2012.


Sound Circle

By Stephen Holdaway

26 Oct, 2010

In contrast to the meandering development of my first MDDN221 project, “cPU”, “Sound Circle” was very focused, and very technically specific right from the start. I knew exactly what I wanted to do and how the program would work. The challenge I faced was fitting my conventional programming ideas into Cycling ’74s Max/MSP and it’s rather unique approach to programming.

A multi-point camera tracking system allows users to interface with 100 points of a circle. Manipulation of the circle’s points translates directly to samples of a 100 sample waveform (each circle point represents one sample). Made using MaxMSP 5.

The story

Around the start of this project, I had become particularly fond of chip-tune tracking (that’s a fancy name for making 8-bit music or ‘old video game music’ if you will). In my tracker of choice, ‘instruments’ are primarily created by drawing waveforms with the mouse onto a canvas of a set number of samples.

Screenshot of Milky Tracker

The squiggly line is the waveform for an instrument. In this case the waveform is 100 samples, so it would play 44.1 times per second given a sample rate of 44,100 Hz.

Essentially, what I did with this project was to take the two ends of that 100 point line and join them together. The circle’s radius is specifed, and any deviation from that is amplitude. Once I had this, all I did was plug in the the multi-point tracking program from my previous MDDN221 project. The sound could have been refined, however the project as a whole worked on a rudimentary level.

This project also drew inspiration from the project SUB_TRAKT by Anne Niemetz and Holger Foerterer where multiple users interacted separately, but influenced one ‘big picture’.

This is a backdated post. The publish date reflects when the it would have been posted originally, however the actual publish date was later. This post was last modified 23 Apr, 2013.


« Older posts